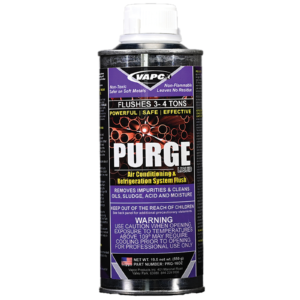
Purge High-Pressure HVAC Line Set Flush | Aerosols PRG- 1, 2
Why flush when you can PURGE?
Standard “flushes” are often just low-pressure solvents that rinse the bottom of the pipe. Purge is different. By combining a proprietary high-concentration solvent with a 140+ PSI delivery system, Purge doesn’t just rinse—it obliterates obstruction.
The industry is full of “convenience” cans that lose pressure in cold trucks or fail to push solvent up vertical line sets. Purge is engineered for the reality of the job site. The elevated pressure ensures consistent velocity in low-temperature environments and long commercial runs, while the active formula chemically emulsifies the sludge, carbon, and acids that cause compressor burnout, turning those line sets into a like-new state.
Manufacturer’s Tech Note: We intentionally pressurize these cans to 140+ PSI because we know technicians leave them in freezing vans overnight or have to work inside walk-in coolers. Standard 55 PSI cans lose pressure in the cold and can’t push sludge up a vertical riser. Purge maintains velocity even in tough conditions.
The Efficiency Math: Do More with Less
Because Purge relies on powerful active ingredients rather than propellant fillers, you get superior coverage per canister.
- 1 lb Canister: Services 3–6 Tons (vs. the industry standard of 3–4 tons).
- 2 lb Canister: Services 5–10 Tons (Best value for large systems).
Professional Application: Designed for the modern technician, Purge is the essential tool for R-410A retrofits, A2L system conversions, new component installation, and heavy-duty burnout maintenance.
| KEY FEATURE / SPECIFICATION |
TRADE BENEFIT / RESULT |
| 140+ PSI Delivery Pressure |
Mechanical Scrubbing Force: Delivers nearly 3x the pressure of generic brands. Maintains high velocity to blast through long vertical runs and restrictive line sets without losing pressure in cold weather environments. |
| High-Yield Economy (3–10 Tons) |
Cost Reduction: High-concentration formula means less propellant and more active solvent. One can often replaces two competitor cans.
• 1 lb Can: Cleans 3–6 Tons.
• 2 lb Can: Cleans 5–10 Tons. |
| High-Solvency Emulsification |
Rapid Contaminant Removal: Chemically dissolves and suspends stubborn carbon residues, tars, oils, and acids from compressor burnouts, preventing redeposition in the line. |
| Non-Flammable & A2L Ready |
Future-Proof Safety: Fully compatible with modern A2L (R-32, R-454B) conversions and R-410A retrofits. Non-toxic, non-flammable formula ensures job-site safety. |
| Zero-Residue Evaporation |
System Protection: Low-boiling point formula evaporates completely under standard vacuum, leaving no oily film or residue to contaminate the new refrigerant charge. |
| Material Compatibility |
Safe for Metals: Engineered to be safe on copper, aluminum, steel, and elastomers. Intended for line sets and coils only. Always bypass/remove metering devices and filter driers. |
| Application Requirement |
Best Practice: For optimal results, always purge with clean, dry nitrogen after injection to push remaining solvent out, then evacuate the system prior to recharging. |
Vapco Field Guide: Performance Matrix
How Purge stacks up against real-world contaminants.
| CONTAMINANT |
WHY IT WINS |
| Compressor Burnout (Sludge/Acid) |
Emulsifies & Ejects: High solvency breaks down hardened carbon while 140+ PSI prevents redeposition. |
| Mineral Oil (R-22 Retrofits) |
Miscible Displacement: Lifts old mineral oil from copper surfaces for a clean R-410A conversion. |
| Moisture & Standing Water |
Physical Displacement: High-density fluid pushes water out; low boiling point ensures rapid vacuum dehydration. |
| A2L / POE Oil Conversion |
Solubilization: Completely removes incompatible oil residues, ensuring safety for A2L retrofits. |
| Component Warning |
Line Sets & Coils ONLY. Do not flush compressors, filter driers, or metering devices (TXV/Piston). |
Part Number Reference:
Select the right capacity for your job. Choose between standard aerosols for maintenance or complete kits to get started.
1. Select Your Aerosol or Kit
| PART # |
SIZE / PACK |
APPLICATION FIT |
| PRG-1 |
1 lb Aerosol
(Case of 6) |
Residential / Service: Cleans 3–6 Tons. The industry standard size for residential repairs, burnouts, and retrofits. |
| PRG-2 |
2 lb Aerosol
(Case of 4) |
Commercial / High-Yield: Cleans 5–10 Tons. Best value for commercial systems, long vertical runs, or multiple residential jobs. |
| PRG-1K / PRG-1K-X3 |
1 lb Kit
(Available 1ea or 3/cs) |
Starter Kit: Includes 1 lb canister + Actuator Valve/Gun. Everything needed to start Purging immediately. |
| PRG-2K |
2 lb Kit
(Sold Individually) |
Master Kit: Includes (2) 2 lb canisters + 1 Actuator Valve. Heavy-duty capacity for large scale contamination removal. |
2. More Configurations & Accessories
| Cylinders |
Large Cylinders (5 lb & 10 lb) Need to flush a VRF or Chiller? Switch to our bulk cylinders for massive volume and high pressure. |
| Tools |
Purge Accessories Find replacement injection valves, hoses, and adapters. |
| More Kits |
Purge Kits View all available Purge kit configurations. Everything you need to get Purging. |
Contractors: Please contact your local Vapco distributor for pricing and availability.
Why Low-Pressure Flush Fails Your Line Set
| THE PAIN POINT (Standard Flush) |
THE PURGE ADVANTAGE |
“The Pressure Drop”
Standard 55-65 PSI cans lose velocity in vertical risers, leaving heavy sludge trapped at the bottom of the loop or solvent all over the floor. |
“140+ PSI Velocity”
Maintains high mechanical scrubbing force to blast through complex piping and lift heavy debris out of vertical runs. Solvent goes exactly where you want it..all the way through the run. |
“The Cold Weather Fail”
Propellants lose power in cold trucks or walk-ins. A cold can often just “trickles” out, failing to scour the pipe. |
“All-Weather Reliability”
Engineered with high initial pressure to ensure consistent flow even in winter conditions or walk-in freezers. |
“Rinsing vs. Cleaning”
Weak solvent blends flow over carbon deposits or flash off before they can dissolve them, leading to repeat burnouts. |
“Chemical Emulsification”
High-concentration formula chemically breaks down and suspends hardened carbon and tar so it can be ejected. |
Directions for Purge High-Pressure HVAC Line Set Flush Aerosols:
WARNING: For use by professional HVACR technicians only. Purge operates at 140+ PSI. Failure to follow these instructions may result in injury or equipment damage.
Safety & Hazard Warnings
- DANGER: Nitrogen Back-Pressure. Never connect the Purge canister directly to a Nitrogen line via a manifold. If Nitrogen back-pressure enters the aerosol can, it may burst.
- Ventilation: Use only in well-ventilated areas. If flushing indoors, open windows or use fans to exhaust fumes.
- PPE: Wear safety glasses and chemical-resistant gloves. Purge is a high-strength solvent that degreases skin instantly.
Phase 1: System Preparation
Before cracking the seal, ensure the system is isolated to prevent damage to sensitive components.
- Isolate & Protect:
- Compressors: Never inject solvent directly into a compressor.
- Metering Devices: Bypass or remove TXVs, pistons, and filter driers. Solvent can lodge debris in these small orifices.
- Large Components: If the system has a receiver or accumulator, inspect it visually. If heavily contaminated, bypass and clean separately or replace.
- Establish Flow Path:
- Disconnect the line set from the indoor and outdoor units.
- Whenever possible, plan to flush from the inside – out to the exterior. This moves fumes and contaminants outside.
- Place a bucket or waste container at the exit point to capture the solvent and sludge.
- High-Pressure Connections (Critical Step):
- Because Purge operates at 140+ PSI (significantly higher than standard flushes), hand-tightening may not be sufficient.
- Gently wrench-tighten the connection between the injection valve and the hose, and the hose to the flush gun.
- Caution: Do not over-tighten to the point of stripping threads, but ensure a firm, pressure-proof seal.
Phase 2: The Flushing Process
Leverage the high pressure and chemical solvency to scrub the line.
- The “Pro Tip” Restriction:
- Crimp the Exit: Use pliers to slightly crimp or restrict the end of the copper discharge line.
- Why? This creates back-pressure, forcing the liquid solvent to fill the volume of the pipe completely (increasing contact time) rather than just running along the bottom of the tube.
- Inject Purge:
- Connect the canister to your injection tool. Hold the canister upright.
- Inject solvent in short, controlled bursts based on tubing diameter:
- Up to 1/2″ Tubing: 10–20 second burst per 50 ft.
- Up to 7/8″ Tubing: 30–40 second burst per 50 ft.
- The Nitrogen Chase (Mandatory):
- Do not rely on the can pressure alone.
- Immediately after the solvent injection, disconnect the Purge canister and connect compressed Nitrogen (set to ~50 PSI).
- Blast Nitrogen through the line. This acts as a squeegee, driving the “plug” of solvent and suspended debris out of the line set.
Phase 3: Verification & Completion
Ensure the line is chemically clean and dry.
- Inspect the Discharge:
- Look at the waste container. The fluid will likely look dark/black initially (carbon and oil).
- Repeat: If the solvent exiting the line is not clear, repeat Steps 5 and 6 until the discharge runs clear and colorless.
- Evacuation:
- Once the line is clear, pull a deep vacuum on the line set.
- Purge is formulated with a low boiling point to flash off rapidly under vacuum, ensuring no chemical residue remains to contaminate the new refrigerant charge.
- Disposal:
- The waste container now holds hazardous contaminants (old oil, acid, sludge). Dispose of the waste solvent in accordance with local, state, and federal regulations (typically in a waste oil container).
FAQs
Frequently Asked Questions: Purge High-Pressure Flush
Application & Performance
Q: How many tons can a single aerosol clean?
A: Purge is engineered with a high-concentration solvent that provides superior yield compared to standard 1 lb flushes.
- 1 lb Canister (PRG-1): Cleans 3–6 Tons.
- 2 lb Canister (PRG-2): Cleans 5–10 Tons.
Note: Actual coverage depends on the severity of the burnout or contamination level.
Q: Why can’t I just use high-pressure Nitrogen to blow out the line?
A: Nitrogen is a gas; it pushes loose debris but cannot clean. Purge is a solvent. It chemically dissolves hardened carbon, tar, and oil that Nitrogen flows right over. You need the chemical action to lift the contaminant, and then the Nitrogen to push it out.
Q: Do I need a specific flush gun to use Purge?
A: No. Purge utilizes a universal oscillation valve that fits most standard HVAC flush guns and injection tools available at wholesalers. You do not need a proprietary adapter.
Q: Why is the pressure so high (140+ PSI)?
A: We pressurize Purge to 140+ PSI to ensure the solvent maintains velocity through long vertical runs and complex piping. Low-pressure flushes (typically ~55 PSI) often lose momentum in these scenarios, allowing sludge to settle. The high pressure ensures a true mechanical scouring action.
Troubleshooting & Tips
Q: The solvent coming out of the line is still dark. What do I do?
A: If the discharge is dark or black, it indicates heavy carbon or oil contamination (common in severe burnouts).
- Repeat the Flush: Continue flushing until the solvent runs clear.
- Upgrade Size: If you are working on a heavily contaminated system, you may need the additional volume of the 2 lb (PRG-2) canister or a bulk cylinder.
Q: I only used half a can. Can I save the rest for the next job?
A: Yes. Purge aerosols do not expire once opened. To ensure the nozzle doesn’t clog, turn the can upside down and spray for 1 second to clear the valve stem. Store it in a cool place, and it will be ready for your next service call.
Q: The canister feels cold or pressure seems low.
A: While Purge performs better than competitors in the cold, extreme low temperatures will naturally lower the pressure of any aerosol.
- Solution: If the can has been sitting in a freezing truck, warm it to room temperature (60°F – 70°F) before use to restore full 140+ PSI pressure. NEVER heat with a torch or open flame.
Safety & Compatibility
Q: Will Purge damage the O-rings in my reusable Flush Gun?
A: No. Purge is safe for short-term exposure to standard Viton and Neoprene O-rings found in most flush kits. However, as a best practice, always blow straight nitrogen through your flush gun after the job is done to ensure no solvent sits on the seals during storage.
Q: Can I use this to clear a clogged condensate drain line?
A: ABSOLUTELY NOT. Purge is a strong chemical solvent designed for metal piping. It can melt PVC/CPVC drain lines and destroy condensate pumps. Use a designated drain opener (like Vapco’s Solve) for drains.
Q: Is this product safe for A2L Refrigerant Conversions?
A: Yes. Purge is ideal for converting systems to A2L refrigerants (like R-32 or R-454B). Its high-solvency formula completely removes mineral oil and alkylbenzene residues that are incompatible with new A2L lubricants.
Logistics & Large Volume
Q: I have a VRF system or Chiller. Do you have larger sizes?
A: Yes. For large volume applications where aerosols are insufficient, we offer bulk cylinders:
- PRG-5: 5 lb Cylinder
- PRG-10: 10 lb Cylinder
These cylinders provide massive liquid volume for large-diameter pipe and commercial runs.
Q: What is the shelf life?
A: Purge aerosols have a shelf life of 5 years from the date of manufacture when stored properly in a cool, dry place out of direct sunlight. Manufacture warranty of 1 year.
Q: How do I dispose of the waste solvent?
A: The used solvent captured in your bucket will contain hazardous system contaminants (acid, oil, sludge). Do not dump it down the drain. Dispose of it in a waste oil container in accordance with your local EPA regulations.
SDS & Instructions
📄 DOWNLOAD FULL SDS (PDF)
⚠️ Professional Use Only
DANGER: Operates at 140+ PSI. Never connect directly to a Nitrogen line via manifold (risk of burst). Use only in well-ventilated areas. Wear chemical-resistant gloves and safety glasses.
Field Guide: Contaminant Removal Matrix
Purge utilizes a high-concentration solvent blend designed to emulsify specific HVAC contaminants. The following matrix details performance against common line set obstructions.
| TARGET CONTAMINANT |
TYPICAL SOURCE |
ACTION |
PERFORMANCE / WHY IT WORKS |
| Compressor Burnout Residue |
Carbon / Sludge / Acid |
Emulsifies & Ejects |
High solvency ratio breaks down hardened carbon deposits while 140+ PSI pressure mechanically scours the pipe wall to prevent redeposition. |
| Mineral Oil / Alkylbenzene |
R-22 Retrofits |
Miscible Displacement |
Purge is fully miscible with mineral oils, allowing it to lift the oil from the copper surface and carry it out of the line set for a clean R-410A conversion. |
| Moisture / Water |
System Leaks / Open Lines |
Displaces |
High-density solvent physically displaces standing water. Low boiling point (106°F) ensures remaining moisture boils off rapidly during vacuum evacuation. |
| Polyol Ester (POE) Oil |
A2L / R-410A Systems |
Solubilizes |
Effectively cleans POE oil residue during component change-outs or compressor replacements. |
System Material Compatibility
| MATERIAL / COMPONENT |
STATUS & PROTOCOL |
| Line Sets & Coils (Copper/Aluminum/Steel) |
✅ SAFE
(Engineered for all standard piping metals) |
| Elastomers (Viton/Neoprene) |
✅ SAFE
(Safe for short-term exposure during flush cycle) |
| Plastics & Painted Surfaces |
⚠️ CAUTION / AVOID
Solvent may soften ABS, acrylics, or strip paint. Wipe up spills immediately. |
| Internal Valves (TXV / Solenoid / Reversing) |
❌ BYPASS / BRIDGE
Solvent can damage valve seals or lodge debris in pilot tubes. Must be bypassed. |
| Compressors & Filter Driers |
❌ DISCONNECT / REMOVE
Do not flush. Isolate line sets before injection. |
Directions for Purge High-Pressure Flush
1. Preparation & Yield Planning
Step 1: Isolate & Protect. Remove or bypass TXVs, pistons, and filter driers. Never inject into a compressor.
Step 2: Establish Flow. Place a waste container at the exit point. Flush from the inside-out.
Step 3: Secure Connections. Gently wrench-tighten all connections. Hand-tightening is insufficient for 140+ PSI.
Tech Tip: To ensure full-volume cleaning, use pliers to slightly crimp the exit of the copper discharge line. This creates back-pressure, forcing the liquid solvent to fill the pipe completely rather than just running along the bottom.
| CONTAINER SIZE |
YIELD |
APPLICATION SCOPE |
| 1 lb Canister (PRG-1) |
3 – 6 Tons |
Residential / Standard: Sufficient for most residential line sets up to 50ft. |
| 2 lb Canister (PRG-2) |
5 – 10 Tons |
Commercial / High-Yield: Best for long vertical runs, large diameters, or heavy burnout contamination. |
| Required Chase |
Nitrogen |
Mandatory: Always chase with compressed dry nitrogen immediately after injection. |
2. Application & Cleaning
- Inject: Hold canister upright. Inject in short, controlled bursts (10-20 sec for small lines, 30-40 sec for large lines).
- The Nitrogen Chase: Immediately disconnect Purge and blast Nitrogen through the line to act as a squeegee.
3. Rinse & Completion
- Inspect Discharge: Look at the waste container. If fluid is dark/black, repeat the flush until it runs clear.
- Evacuate: Pull a deep vacuum. Purge will flash off rapidly, leaving zero residue.
- Dispose: Dispose of waste solvent in accordance with local regulations.
1. Identification & Supplier Details
| Product Name |
Purge Aerosol (Line Set Flush) |
| Product Numbers |
PRG-1, PRG-2, PRG-1K |
| Recommended Use |
A/C & Refrigerator System Flush |
| Emergency Phone |
(800) 255-3924 |
2. Hazards Identification
| GHS Classification |
Acute Tox 4 (Inhalation); Eye Irrit. 2A; Gas Under Pressure |
| Signal Word |
WARNING |
| Hazard Statements |
H280: Contains gas under pressure; may explode if heated.
H319: Causes serious eye irritation.
H332: Harmful if inhaled.
H336: May cause drowsiness or dizziness. |
| Precautionary Statements |
P261: Avoid breathing gas/spray.
P280: Wear protective gloves/eye protection.
P305+P351+P338: IF IN EYES: Rinse cautiously with water.
P410+P403: Protect from sunlight. Store in a well-ventilated place. |
3. Composition / Information on Ingredients
| Component Name |
CAS Number |
Concentration |
| Trans-1,2-dichloroethylene |
156-60-5 |
30 – 60% |
| 1,1,1,2-Tetrafluoroethane |
811-97-2 |
15 – 40% |
| Acetone |
67-64-1 |
1 – 10% |
| Ethanol |
64-17-5 |
1 – 10% |
4. First-Aid Measures
| Inhalation |
Remove to fresh air. If breathing is difficult, give oxygen. Get medical attention. |
| Skin Contact |
Flush with water for 15 minutes. Treat for frostbite if necessary. |
| Eye Contact |
Rinse immediately with plenty of water for 15 minutes. Remove contact lenses. Get medical attention. |
5. Fire-Fighting Measures
| Extinguishing Media |
CO2, alcohol-resistant foam, dry chemical, or water spray. |
| Specific Hazards |
Explosion Hazard: Container may burst if heated. Vapors are heavier than air. |
| Protective Equipment |
Wear self-contained breathing apparatus (SCBA). Fight fire remotely. |
6. Accidental Release Measures
| Precautions |
Ventilate area. Avoid breathing vapors. Eliminate ignition sources. |
| Cleanup |
Absorb liquid spills with inert material. Allow gas to disperse. |
7. Handling & Storage
| Handling |
Do not pierce or burn, even after use. Use only in well-ventilated areas. |
| Storage |
Protect from sunlight. Do not expose to temps exceeding 50°C/122°F. Store locked up. |
| Incompatible Materials |
Strong oxidizers, strong acids, alkaline earth metals, powdered metals. |
8. Exposure Controls / PPE
| Exposure Limits |
Trans-1,2-dichloroethylene: ACGIH TWA 200 ppm.
Acetone: OSHA TWA 1000 ppm. |
| PPE |
Eyes: Chemical safety goggles.
Skin: Chemical resistant gloves.
Respiratory: SCBA if ventilation is insufficient. |
9. Physical & Chemical Properties
| State / Appearance |
Aerosol / Colorless Liquid |
| Boiling Point |
41°C (106°F) |
| Vapor Pressure |
261 mmHg @ 25°C |
| Relative Density |
1.17 (Water=1) |
| Water Solubility |
Insoluble |
10. Stability & Reactivity
| Reactivity |
Reacts violently with strong oxidizers. |
| Stability |
Stable under recommended storage conditions. |
| Decomposition |
Hydrogen chloride, Hydrogen fluoride, Carbonyl fluoride. |
11. Toxicological Information
| Inhalation Toxicity |
Harmful if inhaled. May cause drowsiness or dizziness. |
| Eye/Skin |
Causes serious eye irritation. Causes skin irritation. Risk of frostbite. |
| Carcinogenicity |
Not classified. |
12. Ecological Information
| Ecotoxicity |
Harmful to aquatic life. (Daphnia magna EC50: 220 mg/l). |
| Persistence |
Components are not biodegradable. |
13. Disposal Considerations
| Disposal Method |
Dispose of in accordance with local/regional regulations. |
| Environment |
Avoid release to sewers or waterways. |
14. Transport Information
| Regulation |
UN Number |
Class |
Proper Shipping Name |
| DOT (US) |
UN1950 |
2.2 |
Aerosols, non-flammable |
15. Regulatory Information
| US Federal / State |
TSCA: Listed.
Right To Know (MA, NJ, PA): Trans-1,2-dichloroethylene, Acetone, Ethanol, Nitrogen. |
16. Other Information
| Preparation |
Prepared by: Jessica Wilson
Date: 2/12/2025 |
| Disclaimer |
Information is accurate to the best of our knowledge. No warranty is expressed or implied. |
Specs & Logistics
⚠️ PRG-1, PRG-2 TECHNICAL DATA REPORT – DOWNLOAD
1. Physical & Chemical Properties
| Internal Pressure |
140+ PSI @ 70°F (Maintains velocity in cold) |
| Flammability Status |
Non-Flammable (Safe for A2L environments) |
| Specific Gravity |
1.26 (Heavier than water/oil for displacement) |
| Boiling Point |
106°F (41°C) (Rapid Flash-Off) |
| Active Solvents |
Trans-1,2-dichloroethylene, Ethanol Blend |
| VOC Content |
Low VOC / Compliant (0.06) |
| Appearance |
Clear / Colorless Liquid (Aerosol Spray) |
| Odor |
Characteristic Solvent Odor |
| Shelf Life |
5 Years (from date of manufacture) |
2. UN & DOT Shipping Classification
| Proper Shipping Name: |
Aerosols, Non-Flammable |
| UN Number: |
UN1950 |
| Hazard Class: |
2.2 (Non-Flammable Gas) |
| Packing Group: |
N/A |
| Label Required: |
Non-Flammable Gas (Green) |
3. Master Shipping & Dimensions Guide
| ITEM |
INDIVIDUAL UNIT |
QTY / CASE |
CASE SPECS |
PALLET CONFIGURATION |
CODE |
| Part # |
Wt (lbs) |
H (in) |
W (in) |
L (in) |
Units |
Wt (lbs) |
H (in) |
W (in) |
L (in) |
Cases/Pallet |
Total Units |
Wt (lbs) |
H (in) |
W (in) |
L (in) |
UPC |
PRG-1
(1 lb Can) |
[ ] |
[ ] |
[ ] |
[ ] |
6 |
[ ] |
[ ] |
[ ] |
[ ] |
[ ] |
[ ] |
[ ] |
[ ] |
40 |
48 |
[ ] |
PRG-2
(2 lb Can) |
[ ] |
[ ] |
[ ] |
[ ] |
4 |
[ ] |
[ ] |
[ ] |
[ ] |
[ ] |
[ ] |
[ ] |
[ ] |
40 |
48 |
[ ] |
PRG-1K
(1 lb Kit) |
[ ] |
[ ] |
[ ] |
[ ] |
1 |
[ ] |
[ ] |
[ ] |
[ ] |
[ ] |
[ ] |
[ ] |
[ ] |
40 |
48 |
[ ] |
PRG-1K-X3
(1 lb 3-Pk) |
[ ] |
[ ] |
[ ] |
[ ] |
3 |
[ ] |
[ ] |
[ ] |
[ ] |
[ ] |
[ ] |
[ ] |
[ ] |
40 |
48 |
[ ] |
PRG-2K
(2 lb Kit) |
[ ] |
[ ] |
[ ] |
[ ] |
1 |
[ ] |
[ ] |
[ ] |
[ ] |
[ ] |
[ ] |
[ ] |
[ ] |
40 |
48 |
[ ] |
Harmonized Tariff Code (HTS): 3402.90.5030 (Cleaning Preparations – Aerosol)
NMFC Code: 48580-03 (Cleaning Compound, NOI) – Class 70