
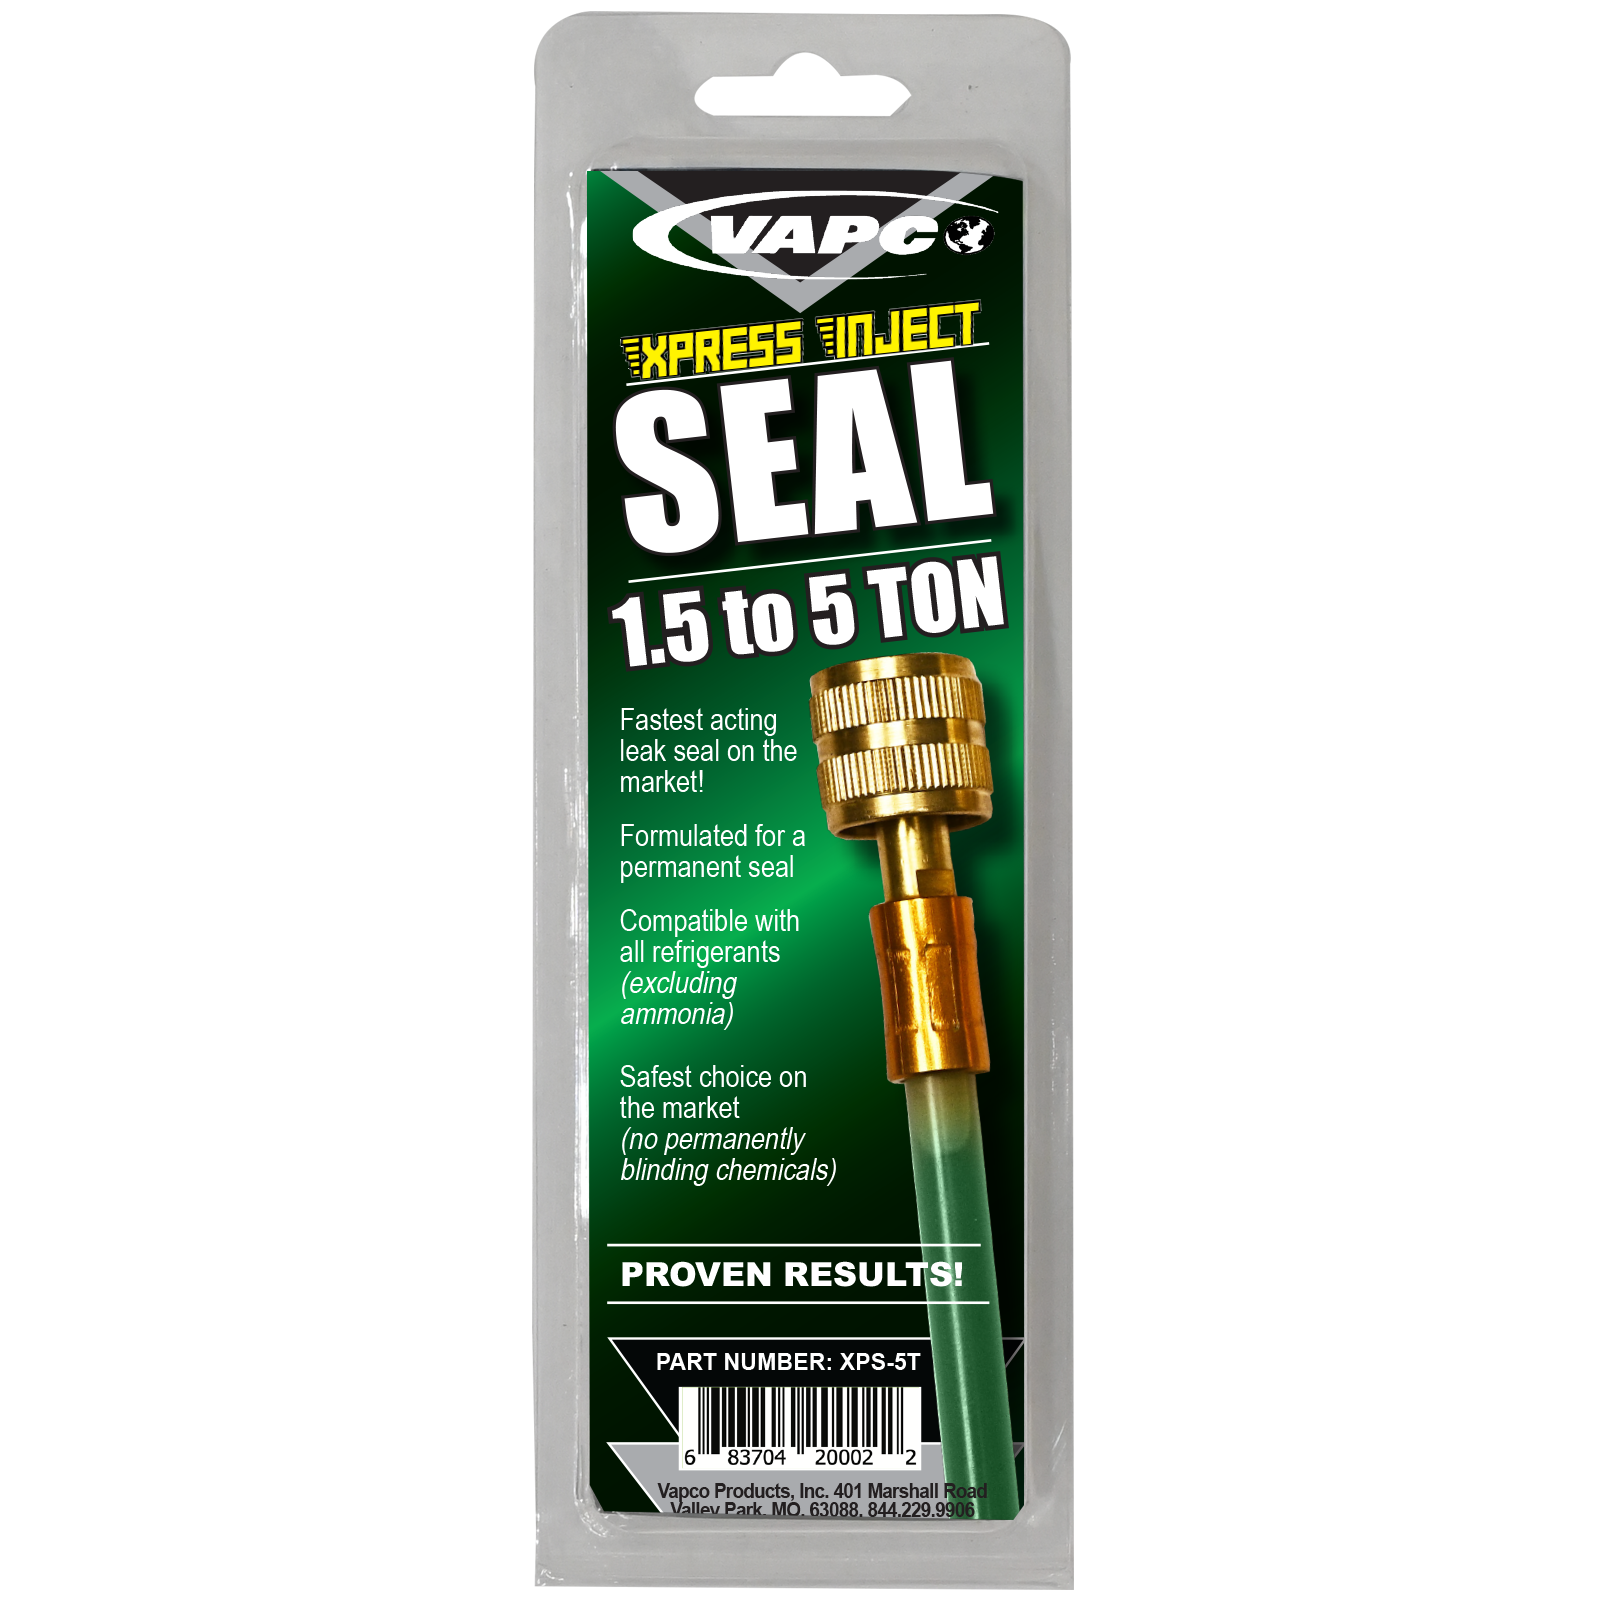
Xpress Seal (XPS Seal Only) | Direct Inject

Xpress Seal circulates as inert monomers inside the closed refrigeration system — completely inactive until atmospheric exposure at the leak point triggers polymerization from outside the system. Nothing forms inside. Nothing clogs.

The only refrigerant leak sealant sized from 3/4 to 60-ton commercial under one formula. Compatible with every refrigerant you are working with today (excluding ammonia).

  • TXV Safe: No pre-formed polymer macromolecules — circulates as monomers smaller than refrigerant molecules until needed.
  • No Pump Down: Installs using system refrigerant pressure through the direct inject hose, your manifold gauges, or Xpress Inject Gun that utilizes completely dry, highest quality available CO2 to ensure safe installation.
  • Full Refrigerant Compatibility: All refrigerants including R-410, R-22, A2L (R-454B,R-32) and A3 (R-290 & R-600a) hydrocarbons. Not for ammonia systems.
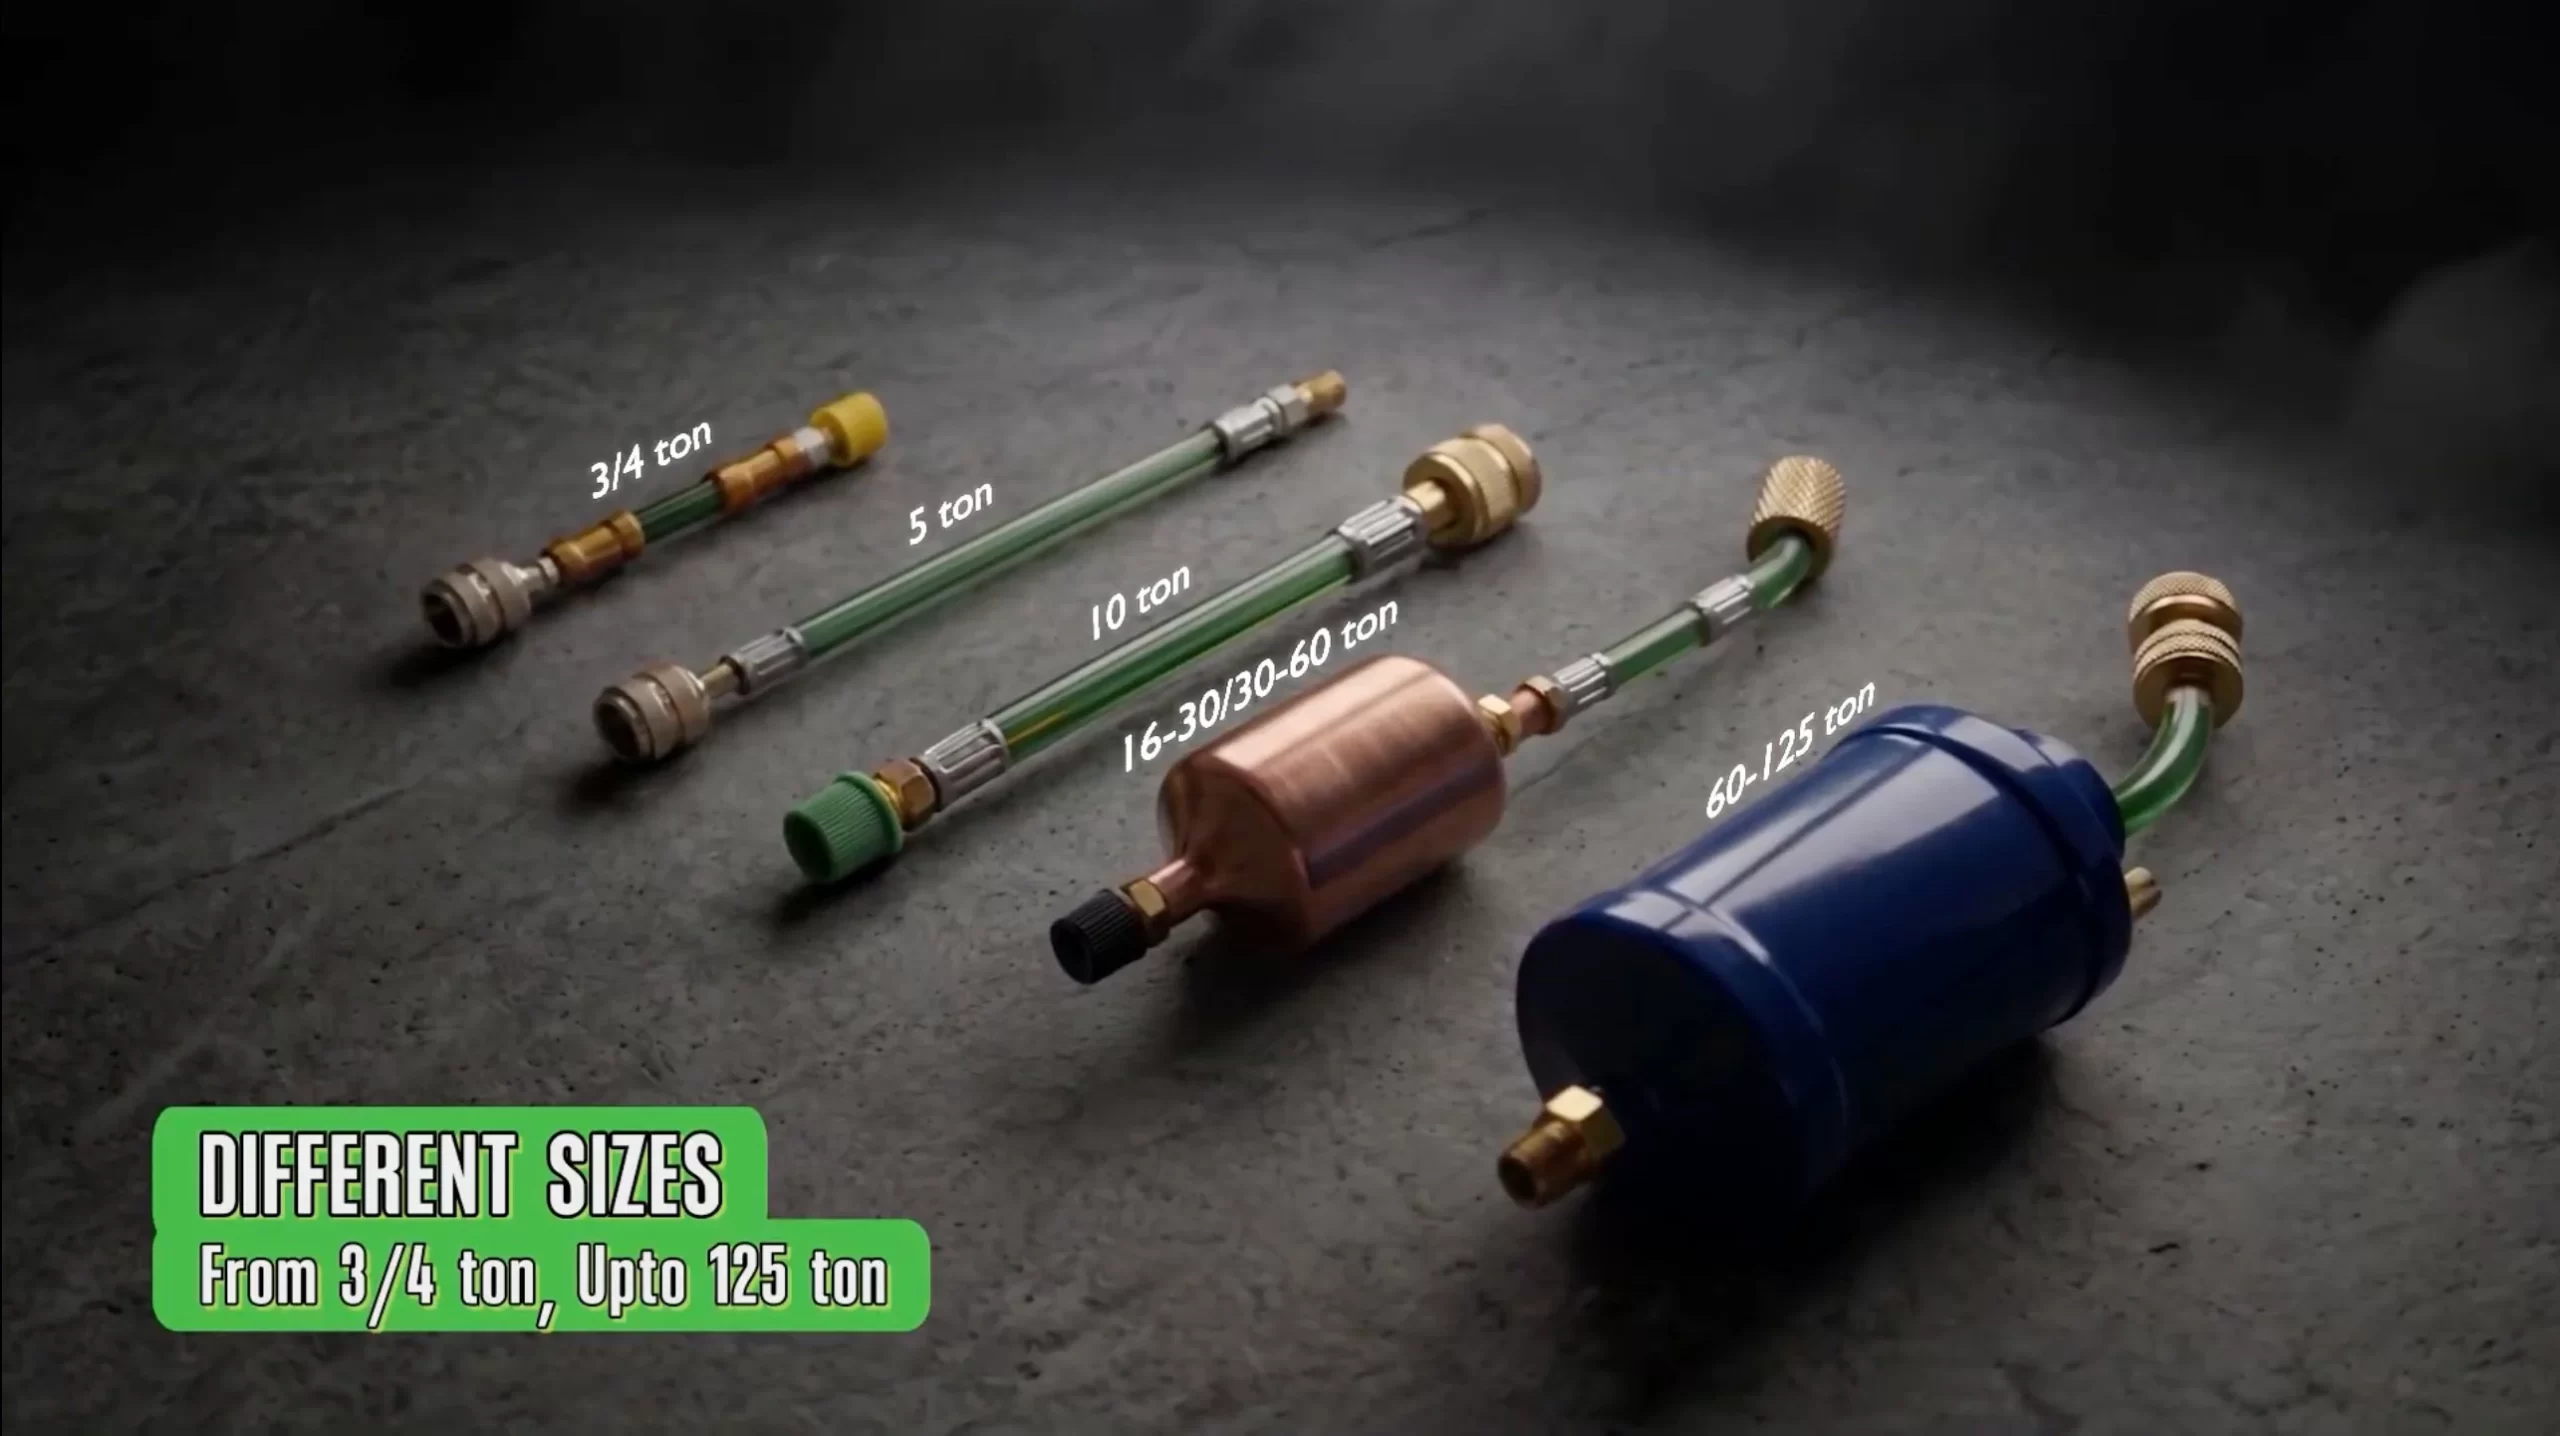
  • Full Size Coverage: Appliances and small systems under 0.75 tons through 60-ton commercial systems.
  • Industrial size available: Upon request we do have 61-125, and 126-250 ton sizes available, contact us for more info.
  • Right Application: Pinhole leaks in evaporator coils, condenser coils, copper line, steel lines, and solder joints.

Xpress Seal AC Leak Sealant | Direct Inject XPS- mini, SS, 5T, 10T, 15T, 30T, 60T

The Formula That Built The Category. Millions of Leaks Sealed.

Built specifically for HVACR service, Xpress Seal is an organosilane-based refrigerant leak sealant that circulates as inert monomers inside the closed system — carried by the refrigerant to every point in the circuit. It does nothing inside the system. At a leak point, atmospheric exposure triggers polymerization from outside the system only— sealing the leak without forming anything inside the circuit.

No pre-formed polymer macromolecules enter the system. This is the distinction that matters: legacy polymer sealants injected macromolecules large enough to obstruct TXV valves and metering devices, this was the problem with early formulations that caused system failures. Xpress Seal does not. The seal forms where the leak is, nothing forms anywhere else.

The result: reduced callbacks, eliminated refrigerant loss, and a permanent pinhole repair — across residential, light commercial, and heavy commercial applications up to 60 tons. (125 and 250 ton available upon request).

Vapco Tech Note — How It Works: Think of Xpress Seal the way you think about platelets in your bloodstream. Platelets circulate harmlessly through a healthy system — completely inert, doing nothing, causing no obstruction. The moment there’s a breach, they activate at the site of injury and form a seal. Not throughout the system. Only where the leak is.

This makes Xpress Seal effective for older systems already losing refrigerant — and as a preventative maintenance option for newer systems that will more than likely develop a pinhole leak at some point in their service life.

Pre-Injection Check: Before injection, confirm a small nitrogen bubble is present and moving freely in the inject tube — this is your quality indicator that the formula is intact and ready to perform.

Installation Note: If the product is not dispensing after connecting to the low-side service port, the Xpress Inject tube depressor may not be making full contact with the Schrader valve core. Using channel-lock pliers or grips, continue tightening the connection until the valve core is fully depressed and flow begins. This is the most common installation issue and is resolved by ensuring a fully seated connection before assuming a product or system problem.

KEY FEATURE / SPECIFICATION TRADE BENEFIT / RESULT
TXV, Gauge & Metering Device Safe No Obstruction Risk:  no pre-formed polymer macromolecules enter the system. Nothing large enough to obstruct a TXV, piston, capillary tube, or EEV at any point. The seal forms outside the system at the leak site only.
No Pump Down Required Install Into a Running System: No pump down required regardless of refrigerant type. Connect to the low-side service port, inject using high-side system pressure, manifold gauges, or the Xpress Inject CO2 Gun. Disconnect. Let the system run 60 minutes.
Full Refrigerant Compatibility Every Refrigerant on Your Truck: Compatible with all refrigerants in active HVACR service — R-410A, R-22, R-32, R-134a, R-404A, R-407C, A2L (R-454B, R-32), and A3 hydrocarbons. Ready for the full A2L transition in new residential equipment. Not compatible with ammonia (NH3) systems.
Recovery Equipment Safe No Contamination Risk: Unreacted monomers circulate with the refrigerant and exit normally during recovery — the same way any refrigerant-miscible additive behaves. Nothing is left behind that wouldn’t already come out in a standard recovery process.
Full Size Coverage — One Brand Stocking Advantage: Seven standard SKUs cover every system your techs are working on — from appliances  0.75-tons through 60-ton commercial systems.
Industrial Sizes Available 125 and 250-Ton On Request: For large commercial and industrial applications — chillers, industrial refrigeration, large VRF systems — 61–125 ton and 126–250 ton sizes are available on request.

Contact Vapco for availability and to put you in contact with a wholesaler near you for pricing.

Minimum System Pressure: 15 PSI Moisture Risk Threshold: System must maintain a minimum of 15 PSI to qualify for standard sealant application. If system pressure has dropped below 15 PSI, moisture contamination is likely — acid formation and internal corrosion may already be present. In this case, use Xpress Seal & Protect or Xpress Protect to neutralize acids and eliminate moisture before or concurrent with sealant injection.
Right Application: 24-Hour Hold Test Qualify the System First: Xpress Seal is engineered for pinhole leaks in evaporator coils, condenser coils, copper line sets, steel lines, and solder joints. If the system can maintain operating pressure and continue running for 24 hours, the leak or leaks are small enough for sealant. If the system loses charge fast enough to become non-functional within 24 hours, the leak is too large for sealant and requires mechanical repair. In that case, use Xpress Seal with UV Dye or UV Dye only to rapidly locate the leak site and perform the mechanical repair.
Preventative Maintenance Application Proactive Service Upsell: Xpress Seal is not only a reactive repair — it’s a proactive maintenance option. Every system will develop micro-leaks at some point in its service life, particularly at solder joints and coil connections subject to thermal cycling. A single application on a healthy system provides ongoing protection against refrigerant loss before it becomes a callback or a coil replacement conversation.

Vapco Field Guide: Xpress Seal Application Matrix

SITUATION WHAT TO DO
Pinhole leak, system still running If it holds operating pressure for 24 hours — inject Xpress Seal or Xpress Inject Combo.
Can’t Find Leak Use Xpress Seal & UV Dye  — seal and locate simultaneously.
System below 15 PSI Moisture is likely in the system. Use Xpress Protect or Seal & Protect to neutralize acid and eliminate moisture before or with sealant injection.
Preventative maintenance No active leak? One application protects against micro-leaks before they become a coil replacement conversation.
Leak too large to locate or hold charge Use UV Dye only to find it. Mechanical repair required.
⚠ Do Not Use Physical cracks, separated fittings, failed Schrader cores, or ammonia systems.

Select Your Size

Match the tube to your system tonnage. Every SKU is labeled — no guessing. Sold in case quantities.

Xpress Seal Direct Inject Tubes

PART # SYSTEM SIZE PACK
XPS-MINI Appliances & Small Systems — Up to 0.75 Ton Case of 6
XPS-SS Mini Splits & Small Systems — Up to 1.5 Ton Case of 6
XPS-5T Residential — 1.5 to 5 Ton Case of 6 — Most popular residential size
XPS-10T Light Commercial — 2 to 10 Ton Case of 4
XPS-15T Mid Commercial — 6 to 15 Ton Case of 4
XPS-30T Large Commercial — 16 to 30 Ton Case of 4
XPS-60T Heavy Commercial — 31 to 60 Ton Case of 4
XPS-125T & XPS-250T Industrial — Available on Request Contact Vapco for pricing and availability

Injection Tools & Accessories

Inject Gun Xpress Inject Gun (XPS-GUN) CO2-powered injection gun for installations without manifold gauges. Dry, high-quality CO2 ensures safe, clean injection every time.
Inject Hose Xpress Injector Hose (XPS-HOSE) Connects the high-side service port to the inject tube — uses system refrigerant pressure for installation. No additional equipment needed.
CO2 Refills CO2 Cartridge Refills (CO2-5) Replacement CO2 cartridges for the Xpress Inject Gun. Sold in packs of 5.

Contractors: Contact your local Vapco distributor for pricing and availability.

Why Carrier Chemistry Matters – AC Leak Sealant

THE PROBLEM THE XPRESS SEAL DIFFERENCE
Pre-Formed Polymers Large polymer chains injected into the system — big enough to obstruct TXV valves and metering devices. Why the category has a reputation problem. Monomers Only Circulates inert. Polymerizes outside the system at the leak point only. Nothing forms inside.
Oil-Carrier Sealants Don’t mix with refrigerant. Non-miscible mass hits the compressor — you can hear the compressor strain. Can’t scale beyond light commercial due to volume limitations. Refrigerant-Carried Fully miscible. Travels with refrigerant to every point in the circuit. No compressor impact. Scales from window unit to 60 tons.
Can’t Scale Oil-carrier products hit a ceiling at larger tonnages. No oil-carrier sealant covers commercial applications effectively. Appliances to 250 Ton Same formula, every size. No other sealant formula covers this range under one product family.


SDS & Instuctions

⚠️ XPRESS SEAL DIRECT INJECT SDS — DOWNLOAD

⚠️ Professional Use Only — Flammable LiquidContains highly flammable liquid and vapor. Keep away from heat, sparks, open flames, and hot surfaces. No smoking. Use only in well-ventilated areas. Wear chemical-resistant gloves and eye protection. For professional HVACR use only. Always read the full SDS before use.

Directions for Use — Xpress Seal Direct Inject

Pre-Installation Checks — All Methods

Before beginning, ensure the system is ready and you have the correct Xpress Seal tube for the system’s tonnage.

  • Select Correct Size: Match the tube to system tonnage. Every tube is labeled — XPS-MINI through XPS-60T. Industrial sizes available on request.
  • System Running: System must be powered on with compressor engaged. Heat pumps must be set to Cooling Mode.
  • System Charge: Verify adequate refrigerant charge and minimum 15 PSI system pressure. Can be injected into a fully charged or partially low system.
  • Refrigerant Compatibility: Confirm the system is NOT an ammonia (NH3) system. Xpress Seal is not compatible with ammonia systems.
  • Inspect the Tube: Do not bend, cut, or deform the tube. Confirm a small nitrogen bubble is present and moving freely — this is your quality indicator that the formula is intact.
  • Identify Service Ports: Clearly identify the low-side (suction) and high-side (liquid) service ports before proceeding.

Method 1 — Manifold-Assisted High-Side System Pressure Injection

Uses the system’s own high-side pressure to push Xpress Seal into the low-pressure side. No additional equipment required beyond your manifold gauge set.

  1. Loosely connect the Xpress Inject tube to the low-side service port. Do not fully tighten yet.
  2. Connect manifold: Attach red hose to high-side port. Attach blue hose to the Xpress Inject tube. Ensure both manifold valves are fully closed.
  3. Purge the hose: Quickly crack open and close the high-side (red) manifold valve to purge air from the blue hose. Close the red valve.
  4. Fully tighten the Xpress Inject tube onto the low-side service port.
  5. Inject: Slowly open the red (high-side) manifold valve, then slowly open the blue (low-side) manifold valve. High-side pressure pushes the sealant into the system. Watch the tube — suction draws the sealant through until the tube is clear.
  6. Disconnect: Close blue valve, then red valve. Disconnect manifold from Xpress Inject, then from service port. Cap the port securely.
  7. Run time: Run the system for a minimum of 1 hour. Allow 2–4 hours for larger systems or cold conditions.
Installation Note: If the product is not dispensing after connecting to the low-side service port, the Xpress Inject tube depressor may not be making full contact with the Schrader valve core. Using channel-lock pliers or grips, continue tightening the connection until the valve core is fully depressed and flow begins. This is the most common installation issue — keep tightening until you hear the flow begin.

Method 2 — Refrigerant Tank Assisted Injection

Alternative to high-side system pressure. Use when high-side access is limited.

  1. Connect the blue (low-side) manifold hose to the Xpress Inject tube.
  2. Connect the center (yellow) manifold hose to a refrigerant supply tank matching the system refrigerant.
  3. Purge the yellow hose.
  4. Open the refrigerant tank, then slowly open the blue (low-side) manifold valve. Tank pressure combined with system suction pushes the sealant in.
  5. Once the tube is clear, close the blue valve, then close the tank. Disconnect and cap the service port.
  6. Run the system for a minimum of 1 hour.

Post-Injection Best Practices

  • Run Time: Minimum 1 hour immediately after injection. 2–4 hours for larger systems or cold conditions.
  • System Monitoring: Monitor operating pressures and temperatures. Xpress Seal will not alter system performance or clog metering devices.
  • Leak Verification: After the recommended run time, verify leak resolution using standard diagnostic methods.
  • Documentation: Record the application in the system service log — date, product size used, and method.

Professional Notes

  • Concurrent Refrigerant Charging: If the system is low on refrigerant, Xpress Seal can be injected simultaneously with refrigerant charging using the refrigerant being added to push the sealant in.
  • No Pump Down Required: Xpress Seal does not require pumping down the system for injection, regardless of refrigerant type.
  • Schrader Core Depth: If the tube depressor does not engage the valve core, turn the depressor counterclockwise (max 1 turn) until it properly engages before proceeding. Wear eye protection and perform procedure in a safe location as inject could be pressurized with refrigerant. 

Vapco Products, Inc.
Safety Data Sheet
Xpress Seal Direct Inject

SECTION 1: Identification

1.1 GHS Product Identifier
Product name: Xpress Seal Direct Inject
Product numbers: XPS-MINI, XPS-SS, XPS-5T, XPS-10T, XPS-15T, XPS-30T, XPS-60T, XPS-125T, XPS-250T
Brand: Vapco

1.3 Recommended Use
Refrigerant leak sealant for professional HVACR use only.

1.4 Supplier Details
Vapco Products, Inc. | 401 Marshall Road, Valley Park, MO 63088
Telephone: (636) 923-2121 | Fax: (636) 923-3002 | Email: [email protected]

1.5 Emergency Phone
(800) 255-3924

SECTION 2: Hazard Identification

2.1 GHS Classification — OSHA (29 CFR 1910.1200, 2012)
Aspiration hazard, Cat. 1 | Flammable liquids, Cat. 2 | Skin corrosion/irritation, Cat. 2

Signal word: DANGER

Hazard Statements
H225 — Highly flammable liquid and vapor
H304 — May be fatal if swallowed and enters airways
H315 — Causes skin irritation

Precautionary Statements
P210 — Keep away from heat, sparks, open flames, hot surfaces. No smoking.
P233 — Keep container tightly closed.
P240 — Ground/bond container and receiving equipment.
P241 — Use explosion-proof electrical/ventilating/lighting equipment.
P242 — Use only non-sparking tools.
P243 — Take precautionary measures against static discharge.
P264 — Wash hands thoroughly after handling.
P280 — Wear protective gloves/eye protection/face protection.
P301+P310 — IF SWALLOWED: Immediately call a POISON CENTER/doctor.
P302+P352 — IF ON SKIN: Wash with plenty of water.
P303+P361+P353 — IF ON SKIN (or hair): Take off contaminated clothing. Rinse skin with water/shower.
P321 — Specific treatment: see First Aid.
P331 — Do NOT induce vomiting.
P332+P313 — If skin irritation occurs: Get medical advice/attention.
P362+P364 — Take off contaminated clothing and wash before reuse.
P370+P378 — In case of fire: Use dry chemical to extinguish.
P403+P235 — Store in a well-ventilated place. Keep cool.
P405 — Store locked up.
P501 — Dispose of contents/container per applicable regulations.

SECTION 3: Composition / Ingredients

3.2 Mixtures

Hazardous Component CAS No. Concentration
Silane, ethenyltriethoxy- 78-08-0 20–75% (weight)
Ethanol 64-17-5 2–25% (weight)
Toluene 108-88-3 <1% (weight)

SECTION 4: First-Aid Measures

General: Never give anything by mouth to an unconscious person. If unwell, seek medical advice.
If inhaled: Remove to fresh air. Keep at rest in a comfortable breathing position. Get medical attention.
Skin contact: Drench with water for at least 15 minutes. Remove contaminated clothing. Seek medical attention if irritation persists.
Eye contact: Rinse with water for at least 15 minutes. Remove contact lenses. Seek medical attention if irritation persists.
If swallowed: Rinse mouth. Do NOT induce vomiting. Get immediate medical attention.

SECTION 5: Fire-Fighting Measures

Extinguishing media: Water spray, fog, CO2, alcohol-resistant foam, dry chemical, or sand.
Specific hazards: Container may explode in heat of fire. Vapors are heavier than air and may travel to ignition sources. Reacts with strong oxidants causing fire and explosion hazard.
Protective actions: Wear NIOSH-approved SCBA with full face piece and full body protective clothing. Do not enter fire area without respiratory protection. Fight fire remotely due to explosion risk.

SECTION 6: Accidental Release Measures

Personal precautions: No smoking. Keep away from all ignition sources. Wear appropriate PPE. Ventilate area immediately.
Environmental precautions: Prevent entry to sewers and public waters.
Cleanup: Eliminate all ignition sources first. Contain spill with dikes or absorbents. Transfer to suitable containers for disposal. Dispose per applicable regulations.

SECTION 7: Handling and Storage

Handling: Read all safety precautions before use. Avoid contact with skin, eyes, and clothing. Do not breathe vapors or spray. Wash hands thoroughly after handling. No open flames or ignition sources during use. Vapors may collect in low-lying areas.
Storage: Store in a cool, dry, well-ventilated place away from ignition sources and direct sunlight. Do not expose to temperatures exceeding 50°C/122°F. Keep in original container. Store locked up.
Incompatible materials: Heat sources and strong oxidizers.

SECTION 8: Exposure Controls / Personal Protection

Exposure limits:
Ethanol: OSHA PEL 1000 ppm | NIOSH REL 1000 ppm
Toluene: OSHA PEL 200 ppm | ACGIH TLV 50 ppm

Engineering controls: Ensure adequate ventilation. Use explosion-proof equipment. Emergency eye wash and safety shower should be available nearby. Proper grounding to avoid static electricity.

PPE:
Eyes: Chemical safety goggles
Skin: Chemical-resistant gloves and protective clothing
Respiratory: NIOSH-approved SCBA if exposure exceeds established limits

SECTION 9: Physical and Chemical Properties

Physical state Liquid
Color Clear
Odor Amine odor
Flammability Flammable liquid — OSHA (29 CFR 1910.1200)
Solubility Insoluble in water
Evaporation rate Fast
Relative vapor density >1 (Heavier than air)

SECTION 10: Stability and Reactivity

Reactivity: Reacts with oxidants causing fire and explosion hazard.
Chemical stability: Stable under recommended handling and storage conditions.
Hazardous reactions: None known.
Conditions to avoid: Direct sunlight, extreme temperatures, open flame, heat, sparks.
Incompatible materials: Heat, strong oxidizers.
Hazardous decomposition products: Carbon oxides.

SECTION 11: Toxicological Information

Acute toxicity:
Ethanol: LD50 Oral (Rat) 7,060 mg/kg
Toluene: LD50 Oral (Rat) >5,580 mg/kg
Silane, ethenyltriethoxy-: LD50 Dermal (Rabbit) 9,100 mg/kg

Skin/Eye: May cause skin and mild eye irritation.
Inhalation: May cause respiratory tract irritation.
Carcinogenicity: No component at ≥0.1% is identified as a known carcinogen by NTP, OSHA, or IARC.
Chronic symptoms: None expected under normal conditions of use.

SECTION 12: Ecological Information

Toxicity (Toluene): LC50 Rainbow trout 7.63 mg/l (96h) | EC50 Daphnia magna 6 mg/l (48h)
Persistence/degradability: No data available.
Bioaccumulation: No data available.
Other: Avoid release to the environment. Prevent entry to sewers and waterways.

SECTION 13: Disposal Considerations

Product disposal: Contact a licensed professional waste disposal service. Highly flammable — exercise care. Dispose per local, regional, national, and international regulations.
Container: May remain hazardous when empty. Do not puncture or incinerate.

SECTION 14: Transport Information

Regulation UN Number Class Proper Shipping Name
DOT (US) UN1993 3 Flammable liquids, n.o.s. — Packing Group III
IMDG UN1993 3 Flammable liquids, n.o.s. — Packing Group III
IATA UN1993 3 Flammable liquids, n.o.s. — Packing Group III

SECTION 15: Regulatory Information

California Proposition 65: WARNING — This product can expose you to Toluene, known to the State of California to cause birth defects or other reproductive harm. For more information: www.P65Warnings.ca.gov

Right To Know Components:
Massachusetts: Denatured Alcohol (64-17-5), Methylbenzene (108-88-3)
New Jersey: Ethyl Alcohol (64-17-5), Toluene (108-88-3)
Pennsylvania: Ethanol (64-17-5), Benzene, Methyl- (108-88-3)

US EPA TSCA: Ethanol (64-17-5) | Toluene (108-88-3) | Silane, ethenyltriethoxy- (78-08-0)

SECTION 16: Other Information

N/A = Not applicable | N/D = Not determined

Disclaimer: Information contained herein is believed to be accurate but is provided without warranty. Final determination of suitability is the sole responsibility of the user. Vapco Products, Inc. assumes no liability for improper use.

Prepared by: Jessica Wilson | Date: 1/22/2026 | Version: 1.0

Resources

Full Product Video

Watch the Trailer

Is it safe – Article

Read the History